Fission Reactor: Difference between revisions
mNo edit summary |
SoccPuppet (talk | contribs) m (→Temperature: typo) |
||
| (62 intermediate revisions by 18 users not shown) | |||
| Line 2: | Line 2: | ||
[[File:Fission reactor.png|thumb|right]] | [[File:Fission reactor.png|thumb|right]] | ||
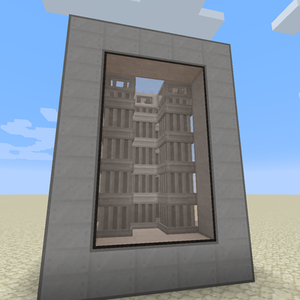
A '''Fission Reactor''' is a multiblock structure that generates massive amounts of heat but does not produce power on its own. How much heat is generated depends on the rate at which it burns [[Fissile Fuel]]. The only way to transform this heat into power is to inject "fresh" coolant into the reactor and use the heated coolant that comes out to generate power. With water cooled reactors, power is generated by directly piping steam into an [[Industrial Turbine]]. Sodium cooled reactors use a [[Thermoelectric Boiler]] as a heat-exchanger to cool down the [[Superheated sodium]] and heat up water into [[Steam]] that is in turn sent to an [[Industrial Turbine]]. | |||
Fission reactors need special care: even at very low burn rates, they generate heat faster than they can dissipate it to the environment. The biggest problem most players will face will be to maintain a steady flow of coolant. | |||
'''For more tips and tutorials, see the [[Fission Reactor Tutorial]] page.''' | |||
'''Note: You must have Mekanism: Generators installed to have the fission reactor in your game. Without generators, there is no way to obtain [[Polonium Pellet|polonium]] using only base Mekanism.''' | |||
== Construction == | == Construction == | ||
* The structure must be a cuboid of minimum size 3x4x3 (along X, Y and Z), up to 18x18x18. | * The structure must be a cuboid of minimum outside size 3x4x3 (along X, Y and Z), up to 18x18x18. | ||
* The edges of the outer shell must be made of [[Fission Reactor Casing]] | * The edges of the outer shell must be made of [[Fission Reactor Casing]] | ||
* The faces of the outer shell can be either [[Fission Reactor Casing]], [[Reactor Glass]], [[Fission Reactor Port]] or [[Fission Reactor Logic Adapter]] | * The faces of the outer shell can be either [[Fission Reactor Casing]], [[Reactor Glass]], [[Fission Reactor Port]] or [[Fission Reactor Logic Adapter]] | ||
* The interior of the cube can be either air or fission control rods: | * The interior of the cube can be either air or fission control rods: | ||
** A control rod is formed by a 1x1 block wide column made of 1 to 15 [[Fission Fuel Assembly]] and a single [[Control Assembly]] at the top | ** A control rod is formed by a 1x1 block wide column made of 1 to 15 [[Fission Fuel Assembly]] and a single [[Control Rod Assembly]] at the top | ||
** Control rods | ** Control rods should not touch each other. Optimal control rod density can be achieved by placing them in a checkerboard pattern. Cooling is penaltized if control rods touch each other. | ||
A fission reactor requires at least 4 [[Fission Reactor Port]]s: | A fission reactor requires at least 4 [[Fission Reactor Port]]s: | ||
| Line 32: | Line 26: | ||
* One waste output | * One waste output | ||
Output ports must be configured to the proper output type by crouching and right-clicking them with a [[Configurator]] set to any of the configure modes. | |||
Output ports must be configured to the proper output type by crouching and right-clicking them with a [[Configurator]]. | |||
== Reactor GUI == | == Reactor GUI == | ||
| Line 53: | Line 46: | ||
The burn rate is the rate at which the reactor will burn [[Fissile Fuel]]. For a newly formed reactor, it is automatically set to 0.1 mB/t. It can be changed in the reactor's statistics tab. | The burn rate is the rate at which the reactor will burn [[Fissile Fuel]]. For a newly formed reactor, it is automatically set to 0.1 mB/t. It can be changed in the reactor's statistics tab. | ||
The | The maximum burn rate is 1 mB/t per [[Fission Fuel Assembly]] in the reactor, but the safe maximum burn rate depends on a number of factors (see [[Fission Reactor Tutorial]]). | ||
=== Heating Rate === | === Heating Rate === | ||
The heating rate represents how much coolant is heated up per tick. The actual value depends on the burn rate. For a burn rate of one 1 mB/t, the heating rate is: | The heating rate represents how much coolant is heated up per tick. The actual value depends on the burn rate. For a burn rate of one 1 mB/t, the heating rate is: | ||
* | * 20,000 mB/t for a water cooled reactor | ||
* | * 200,000 mB/t for a sodium cooled reactor | ||
For safe operation, the external cooling setup must be able to handle that much heated coolant per tick | For safe operation, the external cooling setup must be able to handle that much heated coolant per tick. | ||
=== Temperature === | === Temperature === | ||
The core's temperature: green | The core's temperature: | ||
* green (< 600K) | |||
* yellow (>600K <1000K) | |||
* orange (>1000K <1200K) | |||
* red (>1200K): the reactor will take structural damage beyond this point. | |||
=== Damage === | === Damage === | ||
This indicates the actual structural damage of the reactor. When a reactor reaches critical temperature, it will start taking damage and this value will go up. The damage value of a reactor that has overheated but been stopped on time to prevent a meltdown will slowly go down on its own, no player intervention is needed. | This indicates the actual structural damage of the reactor. When a reactor reaches critical temperature, it will start taking damage and this value will go up. The damage value of a reactor that has overheated but been stopped on time to prevent a meltdown will slowly go down on its own, no player intervention is needed. | ||
== Cooling and power production == | == Cooling and power production == | ||
Cooling a fission | Cooling a fission reactor and converting the generated heat into power can be done in two ways: water cooling and sodium based cooling. Regardless of the cooling solution, an [[Industrial Turbine]] will be the actual power generator. | ||
'''Important''' (this applies to both cooling solutions): | |||
* the [[Industrial Turbine]] must have [[Saturating Condenser]]s in order to be able to condense steam into water and pipe that water back to the reactor cooling loop. The max water output from a turbine can be seen in its statistics tab. The actual value is 64000 mB of water per condenser. Condensers must be placed above the [[Rotational Complex]]. | |||
* the turbine has an internal energy buffer that will slowly (more or less) fill up. Once full, it will only consume as much steam is needed to provide power to external consumers. As a result, its steam tank will start to fill up if the reactor generates steam faster than the turbine consumes it, less coolant will flow back to the reactor, resulting in less and less fresh coolant in the reactor's coolant tank. The reactor will start to eat up coolant, until meltdown. | |||
== [[Radiation]] and nuclear waste handling == | |||
As a byproduct of burning [[Fissile Fuel]], fission reactors produce [[Nuclear Waste]] which can be converted in [[Polonium Pellet]]s, [[Plutonium Pellet]]s or [[Antimatter Pellet]]s. The first two produce [[Spent Nuclear Waste]] as a byproduct (at a ratio of 1:10), while [[Antimatter]] production is a completely clean process (i.e. no radioactive byproducts). | |||
Nuclear Waste can also be made into reprocessed fuel fragments, which allows for 80% of used fuel to be recovered. Note that looping this process '''does not yield infinite fuel.''' ''However'', it is highly efficient, allowing you to burn the same amount of fuel nearly 5 times longer. | |||
''' | |||
If a material is radioactive, it will be noted in a specially colored tooltip. | |||
Radiation can leak into the environment for the following reasons: | Radiation can leak into the environment for the following reasons: | ||
| Line 208: | Line 89: | ||
* Fission reactor overheating leading to a core meltdown (actually blowing up). | * Fission reactor overheating leading to a core meltdown (actually blowing up). | ||
* Fission reactor running with its waste tank full. | * Fission reactor running with its waste tank full. | ||
* Breaking any block containing radioactive materials. Most notably [[Pressurized Tube]]s and [[Radioactive Waste Barrel]]s, | * Breaking any block containing radioactive materials. Most notably [[Pressurized Tube]]s and [[Radioactive Waste Barrel]]s. This also applies to machines, like a [[Pressurized Reaction Chamber]] containing polonium for example. These can still be broken safely if they are somehow drained of their radioactive contents beforehand. | ||
Radioactive materials can be stored in [[Radioactive Waste Barrel]]s (insert the material from its top or bottom side with a [[Pressurized Tube]]. [[Radioactive Waste Barrel]]s delete their contents at a rate of 1 mB per minute, and are the recommended storage container for waste. Check its page for more information. | |||
[[Quantum Entangloporter]]s cannot handle radioactive materials. As a result, it is not possible to make [[Polonium Pellet]]s with a reactor in the nether (since the [[Solar Neutron Activator]], which is required to produce [[Polonium]] from [[Nuclear Waste]] needs direct sunlight) or have a reactor in the overworld and store waste in the nether. | [[Quantum Entangloporter]]s cannot handle radioactive materials. As a result, it is not possible to make [[Polonium Pellet]]s with a reactor in the nether (since the [[Solar Neutron Activator]], which is required to produce [[Polonium]] from [[Nuclear Waste]] needs direct sunlight) or have a reactor in the overworld and store waste in the nether. | ||
== | ==Detailed Damage/Meltdown Mechanics== | ||
A reactor starts sustaining damage when its temperature is over 1200K. The formula for damage taken per tick is '''min(currentTemp, 1800) / 12 000''' in percentage. This means that at 1200K, the reactor sustains 2% damage per second, and any temperature over 1800K is treated as 1800K (and damages the reactor at 3% per second). | |||
If temperature falls under 1200K, the reactor repairs itself at a rate of '''(1200 - currentTemp) / 120 000''' per tick in percentage. This means that the fastest you can repair a reactor is 0.2% per second. | |||
While damage is over 100% and the temperature is above 1200K, the reactor rolls a chance to meltdown every tick. The precise chance is calculated as '''damage / 1 000''' (unit is in percentage) every tick. For example, at 100% damage the meltdown chance per tick would be 0.1%, while at 100 000% damage the chance would be 100%. | |||
[[File:Fission meltdown safe.png|thumb|A graph showing the chance to reach a certain damage percentage before meltdown. The horizontal axis is damage percentage, the vertical axis is chance in percentage.]] | |||
== Tips & Trivia == | |||
* Experiment in a creative world! There are no consequences for failure, and you can use the following console commands, which are fairly self-explanatory in function: | |||
* Experiment in a creative world! There, you can | |||
/mek build fission | /mek build fission | ||
/mek build remove | /mek build remove | ||
/mek radiation removeAll | /mek radiation removeAll | ||
* A complete removal of every block constituting a reactor will also remove the associated multiblock data. This is applicable to all multiblocks in Mekanism, but only has notable use for a fission reactor. | |||
** Notably, this allows the player to reset structural damage by mining the entire reactor and replacing it. This can be an unintended and tedious way to save a reactor from melting down. | |||
** As it counts as a new multiblock, this also voids any nuclear waste stored inside without releasing radiation into the environment. Beware that voiding nuclear waste like this has been confirmed to be a bug, and might be fixed in the future. | |||
* Theoretically, with the best possible luck, a critical reactor (starting from 0% damage and high temperature) can survive at most 9 hours, 15 minutes and 33 seconds. However, practically the reactor will explode much sooner, since the meltdown chance increases with time and is rolled 20 times a second. | |||
** To reach this point, you must survive 666 666 rolls, each with an increasingly small chance of survival. | |||
** The chance to reach this theoretical best is so small it is difficult to comprehend: an estimation yields 10^-1 600 000, or 1 in 10...0 with 1.6 million zeroes inbetween. For comparison, there are only 10^82 atoms in the universe. | |||
[[Category:Generators]] | |||
{{Mekanism}} | |||
Latest revision as of 07:07, 13 March 2024
A Fission Reactor is a multiblock structure that generates massive amounts of heat but does not produce power on its own. How much heat is generated depends on the rate at which it burns Fissile Fuel. The only way to transform this heat into power is to inject "fresh" coolant into the reactor and use the heated coolant that comes out to generate power. With water cooled reactors, power is generated by directly piping steam into an Industrial Turbine. Sodium cooled reactors use a Thermoelectric Boiler as a heat-exchanger to cool down the Superheated sodium and heat up water into Steam that is in turn sent to an Industrial Turbine.
Fission reactors need special care: even at very low burn rates, they generate heat faster than they can dissipate it to the environment. The biggest problem most players will face will be to maintain a steady flow of coolant.
For more tips and tutorials, see the Fission Reactor Tutorial page.
Note: You must have Mekanism: Generators installed to have the fission reactor in your game. Without generators, there is no way to obtain polonium using only base Mekanism.
Contents
Construction
- The structure must be a cuboid of minimum outside size 3x4x3 (along X, Y and Z), up to 18x18x18.
- The edges of the outer shell must be made of Fission Reactor Casing
- The faces of the outer shell can be either Fission Reactor Casing, Reactor Glass, Fission Reactor Port or Fission Reactor Logic Adapter
- The interior of the cube can be either air or fission control rods:
- A control rod is formed by a 1x1 block wide column made of 1 to 15 Fission Fuel Assembly and a single Control Rod Assembly at the top
- Control rods should not touch each other. Optimal control rod density can be achieved by placing them in a checkerboard pattern. Cooling is penaltized if control rods touch each other.
A fission reactor requires at least 4 Fission Reactor Ports:
- One coolant input
- One coolant output
- One Fissile Fuel input
- One waste output
Output ports must be configured to the proper output type by crouching and right-clicking them with a Configurator set to any of the configure modes.
Reactor GUI
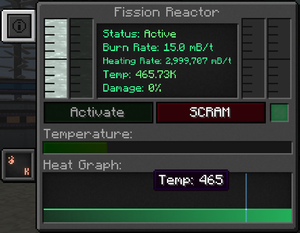
The reactor's GUI shows it's status, burn rate, heating rate, temperature and structural damage (health).
Status
The reactor's running status, either active or disabled.
To activate the reactor, either click the green activation button, or send a redstone signal to a Fission Reactor Logic Adapter configured in activation mode (just right click the Fission Reactor Logic Adapter block to configure it).
The reactor stops when a player clicks the red SCRAM button or if a redstone signal on a logic adapter goes from 1 to 0.
Burn Rate
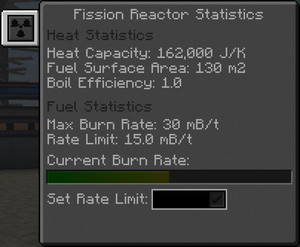
The burn rate is the rate at which the reactor will burn Fissile Fuel. For a newly formed reactor, it is automatically set to 0.1 mB/t. It can be changed in the reactor's statistics tab.
The maximum burn rate is 1 mB/t per Fission Fuel Assembly in the reactor, but the safe maximum burn rate depends on a number of factors (see Fission Reactor Tutorial).
Heating Rate
The heating rate represents how much coolant is heated up per tick. The actual value depends on the burn rate. For a burn rate of one 1 mB/t, the heating rate is:
- 20,000 mB/t for a water cooled reactor
- 200,000 mB/t for a sodium cooled reactor
For safe operation, the external cooling setup must be able to handle that much heated coolant per tick.
Temperature
The core's temperature:
- green (< 600K)
- yellow (>600K <1000K)
- orange (>1000K <1200K)
- red (>1200K): the reactor will take structural damage beyond this point.
Damage
This indicates the actual structural damage of the reactor. When a reactor reaches critical temperature, it will start taking damage and this value will go up. The damage value of a reactor that has overheated but been stopped on time to prevent a meltdown will slowly go down on its own, no player intervention is needed.
Cooling and power production
Cooling a fission reactor and converting the generated heat into power can be done in two ways: water cooling and sodium based cooling. Regardless of the cooling solution, an Industrial Turbine will be the actual power generator.
Important (this applies to both cooling solutions):
- the Industrial Turbine must have Saturating Condensers in order to be able to condense steam into water and pipe that water back to the reactor cooling loop. The max water output from a turbine can be seen in its statistics tab. The actual value is 64000 mB of water per condenser. Condensers must be placed above the Rotational Complex.
- the turbine has an internal energy buffer that will slowly (more or less) fill up. Once full, it will only consume as much steam is needed to provide power to external consumers. As a result, its steam tank will start to fill up if the reactor generates steam faster than the turbine consumes it, less coolant will flow back to the reactor, resulting in less and less fresh coolant in the reactor's coolant tank. The reactor will start to eat up coolant, until meltdown.
Radiation and nuclear waste handling
As a byproduct of burning Fissile Fuel, fission reactors produce Nuclear Waste which can be converted in Polonium Pellets, Plutonium Pellets or Antimatter Pellets. The first two produce Spent Nuclear Waste as a byproduct (at a ratio of 1:10), while Antimatter production is a completely clean process (i.e. no radioactive byproducts).
Nuclear Waste can also be made into reprocessed fuel fragments, which allows for 80% of used fuel to be recovered. Note that looping this process does not yield infinite fuel. However, it is highly efficient, allowing you to burn the same amount of fuel nearly 5 times longer.
If a material is radioactive, it will be noted in a specially colored tooltip.
Radiation can leak into the environment for the following reasons:
- Fission reactor overheating leading to a core meltdown (actually blowing up).
- Fission reactor running with its waste tank full.
- Breaking any block containing radioactive materials. Most notably Pressurized Tubes and Radioactive Waste Barrels. This also applies to machines, like a Pressurized Reaction Chamber containing polonium for example. These can still be broken safely if they are somehow drained of their radioactive contents beforehand.
Radioactive materials can be stored in Radioactive Waste Barrels (insert the material from its top or bottom side with a Pressurized Tube. Radioactive Waste Barrels delete their contents at a rate of 1 mB per minute, and are the recommended storage container for waste. Check its page for more information.
Quantum Entangloporters cannot handle radioactive materials. As a result, it is not possible to make Polonium Pellets with a reactor in the nether (since the Solar Neutron Activator, which is required to produce Polonium from Nuclear Waste needs direct sunlight) or have a reactor in the overworld and store waste in the nether.
Detailed Damage/Meltdown Mechanics
A reactor starts sustaining damage when its temperature is over 1200K. The formula for damage taken per tick is min(currentTemp, 1800) / 12 000 in percentage. This means that at 1200K, the reactor sustains 2% damage per second, and any temperature over 1800K is treated as 1800K (and damages the reactor at 3% per second).
If temperature falls under 1200K, the reactor repairs itself at a rate of (1200 - currentTemp) / 120 000 per tick in percentage. This means that the fastest you can repair a reactor is 0.2% per second.
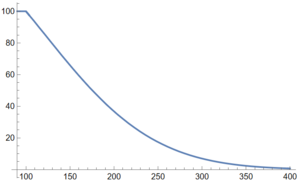
While damage is over 100% and the temperature is above 1200K, the reactor rolls a chance to meltdown every tick. The precise chance is calculated as damage / 1 000 (unit is in percentage) every tick. For example, at 100% damage the meltdown chance per tick would be 0.1%, while at 100 000% damage the chance would be 100%.
Tips & Trivia
- Experiment in a creative world! There are no consequences for failure, and you can use the following console commands, which are fairly self-explanatory in function:
 /mek build fission
 /mek build remove
 /mek radiation removeAll
- A complete removal of every block constituting a reactor will also remove the associated multiblock data. This is applicable to all multiblocks in Mekanism, but only has notable use for a fission reactor.
- Notably, this allows the player to reset structural damage by mining the entire reactor and replacing it. This can be an unintended and tedious way to save a reactor from melting down.
- As it counts as a new multiblock, this also voids any nuclear waste stored inside without releasing radiation into the environment. Beware that voiding nuclear waste like this has been confirmed to be a bug, and might be fixed in the future.
- Theoretically, with the best possible luck, a critical reactor (starting from 0% damage and high temperature) can survive at most 9 hours, 15 minutes and 33 seconds. However, practically the reactor will explode much sooner, since the meltdown chance increases with time and is rolled 20 times a second.
- To reach this point, you must survive 666 666 rolls, each with an increasingly small chance of survival.
- The chance to reach this theoretical best is so small it is difficult to comprehend: an estimation yields 10^-1 600 000, or 1 in 10...0 with 1.6 million zeroes inbetween. For comparison, there are only 10^82 atoms in the universe.
| ||||||||||||||||||||||||||||||||||||||||||||||||||||||||||||||||||||||||||||||||||||||||||||||||||||||||||||||||||||||||||||||||||||||||||||


