Ore Processing: Difference between revisions
m →Tier 0 |
|||
| (14 intermediate revisions by 2 users not shown) | |||
| Line 1: | Line 1: | ||
==Description== | ==Description== | ||
Mekanism adds various tiers of ore processing for better ingot yields from Raw and Silk-Touch'ed Ore. | Mekanism adds various tiers of ore processing for better ingot yields from Raw and Silk-Touch'ed Ore. | ||
| Line 9: | Line 8: | ||
== Tier Comparison == | == Tier Comparison == | ||
The following table represents the input:output ratios for Silk-Touch'ed ore. | |||
{| class="wikitable" style= | <!-- yes, the css for this is AWFUL. I know. Sadly, I can't edit Mediawiki:Common.css in order to define these properly. Too bad! --> | ||
{| class="wikitable" style="border: 1px solid #dfe1e5; overflow: hidden; border-radius: 8px; display:inline-block;" | |||
! style="background: #e4e9f1; border-bottom: 1px solid #dfe1e5; padding: 8px 3px;" | | |||
! !! [[Chemical Dissolution Chamber]] !! [[Chemical Washer]] !! [[Chemical Crystallizer]] !! [[Chemical Injection Chamber]] !! [[Purification Chamber]] !! [[Crusher]] !! [[Enrichment Chamber]] !! [[Energized Smelter]] !! | !! style="background: #e4e9f1; border-bottom: 1px solid #dfe1e5; padding: 8px 3px;" | [[Chemical Dissolution Chamber]] | ||
!! style="background: #e4e9f1; border-bottom: 1px solid #dfe1e5; padding: 8px 3px;" | [[Chemical Washer]] | |||
!! style="background: #e4e9f1; border-bottom: 1px solid #dfe1e5; padding: 8px 3px;" | [[Chemical Crystallizer]] | |||
!! style="background: #e4e9f1; border-bottom: 1px solid #dfe1e5; padding: 8px 3px;" | [[Chemical Injection Chamber]] | |||
!! style="background: #e4e9f1; border-bottom: 1px solid #dfe1e5; padding: 8px 3px;" | [[Purification Chamber]] | |||
!! style="background: #e4e9f1; border-bottom: 1px solid #dfe1e5; padding: 8px 3px;" | [[Crusher]] | |||
!! style="background: #e4e9f1; border-bottom: 1px solid #dfe1e5; padding: 8px 3px;" | [[Enrichment Chamber]] | |||
!! style="background: #e4e9f1; border-bottom: 1px solid #dfe1e5; padding: 8px 3px;" | [[Energized Smelter]] | |||
!! style="background: #e4e9f1; border-bottom: 1px solid #dfe1e5; padding: 8px 3px;" | Yield | |||
!! style="background: #e4e9f1; border-bottom: 1px solid #dfe1e5; padding: 8px 3px;" | Multiplier | |||
|- | |- | ||
| | | style="border-bottom: 1px solid #dfe1e5; padding: 8px 3px; font-weight: bold;" | Additional Input | ||
| style="border-bottom: 1px solid #dfe1e5; padding: 8px 3px;" | 100mb Sulfuric Acid/Ore | |||
| style="border-bottom: 1px solid #dfe1e5; padding: 8px 3px;" | 5mb Water/1mb Dirty Slurry | |||
| style="border-bottom: 1px solid #dfe1e5; padding: 8px 3px;" | 100mb Sulfuric Acid/3 | |||
| style="border-bottom: 1px solid #dfe1e5; padding: 8px 3px;" | 200mb Hydrogen Chloride/each | |||
| style="border-bottom: 1px solid #dfe1e5; padding: 8px 3px;" | 200mb Oxygen/each | |||
| style="border-bottom: 1px solid #dfe1e5; padding: 8px 3px;" | | |||
| style="border-bottom: 1px solid #dfe1e5; padding: 8px 3px;" | | |||
| style="border-bottom: 1px solid #dfe1e5; padding: 8px 3px;" | | |||
| style="border-bottom: 1px solid #dfe1e5; padding: 8px 3px;" | | |||
| style="border-bottom: 1px solid #dfe1e5; padding: 8px 3px;" | | |||
|- | |- | ||
|| || || || || || || 1 Ore || | | style="background: #e4e9f1; border-bottom: 1px solid #dfe1e5; padding: 8px 3px; font-weight: bold;" | Tier 0 | ||
| style="background: #e4e9f1; border-bottom: 1px solid #dfe1e5; padding: 8px 3px;" | | |||
| style="background: #e4e9f1; border-bottom: 1px solid #dfe1e5; padding: 8px 3px;" | | |||
| style="background: #e4e9f1; border-bottom: 1px solid #dfe1e5; padding: 8px 3px;" | | |||
| style="background: #e4e9f1; border-bottom: 1px solid #dfe1e5; padding: 8px 3px;" | | |||
| style="background: #e4e9f1; border-bottom: 1px solid #dfe1e5; padding: 8px 3px;" | | |||
| style="background: #e4e9f1; border-bottom: 1px solid #dfe1e5; padding: 8px 3px;" | | |||
| style="background: #e4e9f1; border-bottom: 1px solid #dfe1e5; padding: 8px 3px;" | | |||
| style="background: #e4e9f1; border-bottom: 1px solid #dfe1e5; padding: 8px 3px;" | 1 Raw Ore | |||
| style="background: #e4e9f1; border-bottom: 1px solid #dfe1e5; padding: 8px 3px;" | 1 Ingot | |||
| style="background: #e4e9f1; border-bottom: 1px solid #dfe1e5; padding: 8px 3px;" | ×1 | |||
|- | |- | ||
| | | style="border-bottom: 1px solid #dfe1e5; padding: 8px 3px; font-weight: bold;" | Tier 1 | ||
| style="border-bottom: 1px solid #dfe1e5; padding: 8px 3px;" | | |||
| style="border-bottom: 1px solid #dfe1e5; padding: 8px 3px;" | | |||
| style="border-bottom: 1px solid #dfe1e5; padding: 8px 3px;" | | |||
| style="border-bottom: 1px solid #dfe1e5; padding: 8px 3px;" | | |||
| style="border-bottom: 1px solid #dfe1e5; padding: 8px 3px;" | | |||
| style="border-bottom: 1px solid #dfe1e5; padding: 8px 3px;" | | |||
| style="border-bottom: 1px solid #dfe1e5; padding: 8px 3px;" | 1 Ore | |||
| style="border-bottom: 1px solid #dfe1e5; padding: 8px 3px;" | 2 [[Dusts]] | |||
| style="border-bottom: 1px solid #dfe1e5; padding: 8px 3px;" | 2 Ingots | |||
| style="border-bottom: 1px solid #dfe1e5; padding: 8px 3px;" | ×2 | |||
|- | |- | ||
|| || || || || 1 Ore || 3 [[Clumps]] || 3 [[Dirty Dusts]] || 3 [[Dusts]] || 3 Ingots || | | style="background: #e4e9f1; border-bottom: 1px solid #dfe1e5; padding: 8px 3px; font-weight: bold;" | Tier 2 | ||
| style="background: #e4e9f1; border-bottom: 1px solid #dfe1e5; padding: 8px 3px;" | | |||
| style="background: #e4e9f1; border-bottom: 1px solid #dfe1e5; padding: 8px 3px;" | | |||
| style="background: #e4e9f1; border-bottom: 1px solid #dfe1e5; padding: 8px 3px;" | | |||
| style="background: #e4e9f1; border-bottom: 1px solid #dfe1e5; padding: 8px 3px;" | | |||
| style="background: #e4e9f1; border-bottom: 1px solid #dfe1e5; padding: 8px 3px;" | 1 Ore | |||
| style="background: #e4e9f1; border-bottom: 1px solid #dfe1e5; padding: 8px 3px;" | 3 [[Clumps]] | |||
| style="background: #e4e9f1; border-bottom: 1px solid #dfe1e5; padding: 8px 3px;" | 3 [[Dirty Dusts]] | |||
| style="background: #e4e9f1; border-bottom: 1px solid #dfe1e5; padding: 8px 3px;" | 3 [[Dusts]] | |||
| style="background: #e4e9f1; border-bottom: 1px solid #dfe1e5; padding: 8px 3px;" | 3 Ingots | |||
| style="background: #e4e9f1; border-bottom: 1px solid #dfe1e5; padding: 8px 3px;" | ×3 | |||
|- | |- | ||
| | | style="border-bottom: 1px solid #dfe1e5; padding: 8px 3px; font-weight: bold;" | Tier 3 | ||
| style="border-bottom: 1px solid #dfe1e5; padding: 8px 3px;" | | |||
| style="border-bottom: 1px solid #dfe1e5; padding: 8px 3px;" | | |||
| style="border-bottom: 1px solid #dfe1e5; padding: 8px 3px;" | | |||
| style="border-bottom: 1px solid #dfe1e5; padding: 8px 3px;" | 1 Ore | |||
| style="border-bottom: 1px solid #dfe1e5; padding: 8px 3px;" | 4 [[Shards]] | |||
| style="border-bottom: 1px solid #dfe1e5; padding: 8px 3px;" | 4 [[Clumps]] | |||
| style="border-bottom: 1px solid #dfe1e5; padding: 8px 3px;" | 4 [[Dirty Dusts]] | |||
| style="border-bottom: 1px solid #dfe1e5; padding: 8px 3px;" | 4 [[Dusts]] | |||
| style="border-bottom: 1px solid #dfe1e5; padding: 8px 3px;" | 4 Ingots | |||
| style="border-bottom: 1px solid #dfe1e5; padding: 8px 3px;" | ×4 | |||
|- | |- | ||
| | | style="background: #e4e9f1; padding: 8px 3px; font-weight: bold;" | Tier 4 | ||
| style="background: #e4e9f1; padding: 8px 3px;" | 1 ore | |||
| style="background: #e4e9f1; padding: 8px 3px;" | 1000mb Dirty [[Slurry]] | |||
| style="background: #e4e9f1; padding: 8px 3px;" | 1000mb Clean [[Slurry]] | |||
|| 1 | | style="background: #e4e9f1; padding: 8px 3px;" | 5 [[Crystals]] | ||
| style="background: #e4e9f1; padding: 8px 3px;" | 5 [[Shards]] | |||
| style="background: #e4e9f1; padding: 8px 3px;" | 5 [[Clumps]] | |||
| style="background: #e4e9f1; padding: 8px 3px;" | 5 [[Dirty Dusts]] | |||
| style="background: #e4e9f1; padding: 8px 3px;" | 5 [[Dusts]] | |||
| style="background: #e4e9f1; padding: 8px 3px;" | 5 Ingots | |||
| style="background: #e4e9f1; padding: 8px 3px;" | ×5 | |||
|} | |} | ||
| Line 48: | Line 104: | ||
==Tier 1== | ==Tier 1== | ||
New machines on this tier: | New machines on this tier:<br> | ||
* [[Enrichment Chamber]] | |||
This tier doubles ingot yield by pre-processing the raw ores in an [[Enrichment Chamber]] before smelting into ingots. | |||
This tier doubles ingot yield | |||
1 Silk Touch Ore → [[Enrichment Chamber]] → 2 [[Dusts]] → [[Energized Smelter]] → 2 Ingots | 1 Silk Touch Ore → [[Enrichment Chamber]] → 2 [[Dusts]] → [[Energized Smelter]] → 2 Ingots | ||
[[File:Tier1. | [[File:Tier1 Ore Processing Example.png|thumbnail|Basic Tier 1 Setup]] | ||
==Tier 2== | ==Tier 2== | ||
| Line 62: | Line 117: | ||
* [[Crusher]] | * [[Crusher]] | ||
This tier triples ingot yield, | This tier triples ingot yield for Silk-Touch'ed ores, or doubles the yield for standard raw ores. It starts by processing raw ores in the [[Purification Chamber]]. This machine is the first introduced in the ore processing pipeline that uses an additional input component as a part of processing its ore. In this case, the chamber uses [[Gases#Oxygen|Oxygen]]. From there, the processed items pass through the [[Crusher]], then the [[Enrichment Chamber]] and are finally smelted into ingots. | ||
# Raw Ore (Raw or Silk Touch'ed) + [[Gases#Oxygen|Oxygen]] → [[Purification Chamber]] → 2 or 3 [[Clumps]] | |||
# [[Clumps]] → [[Crusher]] → [[Dirty Dusts]] → [[Enrichment Chamber]] → [[Dusts]] → [[Energized Smelter]] → 2 or 3 Ingots | |||
[[Gases#Oxygen|Oxygen]] is created by pumping water into an [[Electrolytic Separator]] using an [[Electric Pump]]. | |||
Tip: You can use a [[Gas-Burning Generator]] to recycle the [[Gases#Hydrogen|Hydrogen]] produced as a byproduct of this process back to energy. | |||
[[File:Tier2_Ore_Processing_Example.png|thumbnail|Basic Tier 2 Setup]] | |||
[[File: | |||
==Tier 3== | ==Tier 3== | ||
New machines on this tier: | New machines on this tier:<br> | ||
* [[Chemical Injection Chamber]] | |||
* [[Chemical Infuser]] | |||
This tier quadruples ingot yield. It uses the [[Thermal Evaporation Plant]] multi-block structure, [[Chemical Injection Chamber]], and all machines from the previous tier. | |||
The steps of the process for this tier are as follows: | |||
# Silk Touch Ore + [[Gases#Hydrogen_Chloride|Hydrogen Chloride]] → [[Chemical Injection Chamber]] → 4 [[Shards]] | |||
# | |||
# 4 [[Shards]] + [[Gases#Oxygen|Oxygen]] → [[Purification Chamber]] → 4 [[Clumps]] | # 4 [[Shards]] + [[Gases#Oxygen|Oxygen]] → [[Purification Chamber]] → 4 [[Clumps]] | ||
# 4 [[Clumps]] → [[Crusher]] → 4 [[Dirty Dusts]] → [[Enrichment Chamber]] → 4 [[Dusts]] → [[Energized Smelter]] → 4 Ingots | # 4 [[Clumps]] → [[Crusher]] → 4 [[Dirty Dusts]] → [[Enrichment Chamber]] → 4 [[Dusts]] → [[Energized Smelter]] → 4 Ingots | ||
[[Gases#Hydrogen|Hydrogen]] (from water electrolysis) and [[Gases#Chlorine|Chlorine]] → [[Chemical Infuser]] → [[Gases#Hydrogen_Chloride|Hydrogen Chloride]] | The chain to make [[Gases#Hydrogen_Chloride|Hydrogen Chloride]] is self-sustaining, and breaks into 3 individual loops: | ||
* Water → [[Electric Pump]] → [[Thermal Evaporation Plant]] → [[Brine]] → [[Electrolytic Separator]] → [[Gases#Sodium|Sodium]] and [[Gases#Chlorine|Chlorine]] | |||
* [[Salt]] → [[Chemical Oxidizer]] → [[Gaseous Brine]] → [[Rotary Condensentrator]] → [[Brine]] → [[Electrolytic Separator]] → [[Gases#Sodium|Sodium]] and [[Gases#Chlorine|Chlorine]] | |||
* [[Gases#Hydrogen|Hydrogen]] (from water electrolysis) and [[Gases#Chlorine|Chlorine]] → [[Chemical Infuser]] → [[Gases#Hydrogen_Chloride|Hydrogen Chloride]] | |||
[[File:Tier3.png|thumbnail| | [[File:Tier3 Ore Processing Example.png|thumbnail|Simplified Tier 3 Setup]] | ||
The system pictured above is simplified down to the minimum to achieve this tier—the hydrogen chloride production loop pictured does not reclaim sodium, and instead dumps it. The head for the system is provided by a [[Resistive Heater]] calibrated to 400 FE/t. The optimal value power draw for a heater will vary based on the temperature of the biome that the Thermal Evaporation Plant is built in. | |||
==Tier 4== | ==Tier 4== | ||
| Line 106: | Line 150: | ||
* [[Chemical Crystallizer]] | * [[Chemical Crystallizer]] | ||
This tier quintuples ingot yield. It uses the [[Rotary Condensentrator]], [[Chemical Dissolution Chamber]], [[Chemical Washer]], [[Chemical Crystalizer]], [[Chemical Oxidizer]], | This tier quintuples ingot yield. It uses the [[Rotary Condensentrator]], [[Chemical Dissolution Chamber]], [[Chemical Washer]], [[Chemical Crystalizer]], [[Chemical Oxidizer]], and all machines from the previous tiers. | ||
# 1 Silk Touch Ore + [[Gases#Sulfuric_Acid|Sulfuric Acid]] → [[Chemical Dissolution Chamber]] → Ore [[Slurry]] | # 1 Silk Touch Ore + [[Gases#Sulfuric_Acid|Sulfuric Acid]] → [[Chemical Dissolution Chamber]] → Ore [[Slurry]] | ||
| Line 120: | Line 163: | ||
# [[Water Vapor]] + [[Sulfur Trioxide]] → [[Chemical Infuser]] → [[Gases#Sulfuric_Acid|Sulfuric Acid]] | # [[Water Vapor]] + [[Sulfur Trioxide]] → [[Chemical Infuser]] → [[Gases#Sulfuric_Acid|Sulfuric Acid]] | ||
[[File:Tier4.png|thumbnail| | [[File:Tier4 Ore Processing Example.png|thumbnail|Simplified Tier 4 Setup]] | ||
== Video Tutorial == | == Video Tutorial == | ||
''All links refer to YouTube's watch page.'' | ''All links refer to YouTube's watch page.'' | ||
[https://www.youtube.com/watch?v=7DLEd60EFbs Felipe D Tutorial PT-BR]<br> | |||
[https://www.youtube.com/watch?v=RAtrZP73mNA EsquilãoBR Tutorial PT-BR] | [https://www.youtube.com/watch?v=RAtrZP73mNA EsquilãoBR Tutorial PT-BR] | ||
Latest revision as of 20:20, 28 July 2025
Contents
Description
Mekanism adds various tiers of ore processing for better ingot yields from Raw and Silk-Touch'ed Ore.
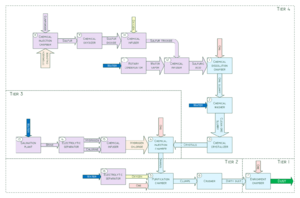
Each tier use a specific machine to process the raw ore into a product—ingots, dusts, clumps, shards or crystals. The product of each tier is then processed by the machines of the previous tiers.
Tier Comparison
The following table represents the input:output ratios for Silk-Touch'ed ore.
| Chemical Dissolution Chamber | Chemical Washer | Chemical Crystallizer | Chemical Injection Chamber | Purification Chamber | Crusher | Enrichment Chamber | Energized Smelter | Yield | Multiplier | |
|---|---|---|---|---|---|---|---|---|---|---|
| Additional Input | 100mb Sulfuric Acid/Ore | 5mb Water/1mb Dirty Slurry | 100mb Sulfuric Acid/3 | 200mb Hydrogen Chloride/each | 200mb Oxygen/each | |||||
| Tier 0 | 1 Raw Ore | 1 Ingot | ×1 | |||||||
| Tier 1 | 1 Ore | 2 Dusts | 2 Ingots | ×2 | ||||||
| Tier 2 | 1 Ore | 3 Clumps | 3 Dirty Dusts | 3 Dusts | 3 Ingots | ×3 | ||||
| Tier 3 | 1 Ore | 4 Shards | 4 Clumps | 4 Dirty Dusts | 4 Dusts | 4 Ingots | ×4 | |||
| Tier 4 | 1 ore | 1000mb Dirty Slurry | 1000mb Clean Slurry | 5 Crystals | 5 Shards | 5 Clumps | 5 Dirty Dusts | 5 Dusts | 5 Ingots | ×5 |
Tier 0
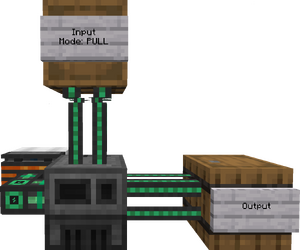
This is the traditional process of directly smelting raw ores into ingots. The output of processed materials is the same between the vanilla Furnace and Mekanism's Energized Smelter. Notably, the Energized Smelter can accept upgrades to its efficiency and speed, as well as accept power from Mekanism's various generators.
In this example, power is provided by a Heat Generator "waterlogged" with lava in order to generate passive energy.
1 Raw Ore → Energized Smelter → 1 Ingot
Tier 1
New machines on this tier:
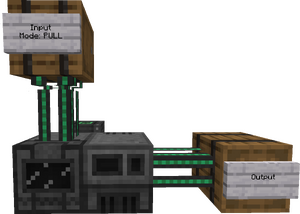
This tier doubles ingot yield by pre-processing the raw ores in an Enrichment Chamber before smelting into ingots.
1 Silk Touch Ore → Enrichment Chamber → 2 Dusts → Energized Smelter → 2 Ingots
Tier 2
New machines on this tier:
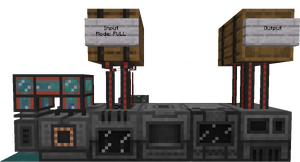
This tier triples ingot yield for Silk-Touch'ed ores, or doubles the yield for standard raw ores. It starts by processing raw ores in the Purification Chamber. This machine is the first introduced in the ore processing pipeline that uses an additional input component as a part of processing its ore. In this case, the chamber uses Oxygen. From there, the processed items pass through the Crusher, then the Enrichment Chamber and are finally smelted into ingots.
- Raw Ore (Raw or Silk Touch'ed) + Oxygen → Purification Chamber → 2 or 3 Clumps
- Clumps → Crusher → Dirty Dusts → Enrichment Chamber → Dusts → Energized Smelter → 2 or 3 Ingots
Oxygen is created by pumping water into an Electrolytic Separator using an Electric Pump.
Tip: You can use a Gas-Burning Generator to recycle the Hydrogen produced as a byproduct of this process back to energy.
Tier 3
New machines on this tier:
This tier quadruples ingot yield. It uses the Thermal Evaporation Plant multi-block structure, Chemical Injection Chamber, and all machines from the previous tier.
The steps of the process for this tier are as follows:
- Silk Touch Ore + Hydrogen Chloride → Chemical Injection Chamber → 4 Shards
- 4 Shards + Oxygen → Purification Chamber → 4 Clumps
- 4 Clumps → Crusher → 4 Dirty Dusts → Enrichment Chamber → 4 Dusts → Energized Smelter → 4 Ingots
The chain to make Hydrogen Chloride is self-sustaining, and breaks into 3 individual loops:
- Water → Electric Pump → Thermal Evaporation Plant → Brine → Electrolytic Separator → Sodium and Chlorine
- Salt → Chemical Oxidizer → Gaseous Brine → Rotary Condensentrator → Brine → Electrolytic Separator → Sodium and Chlorine
- Hydrogen (from water electrolysis) and Chlorine → Chemical Infuser → Hydrogen Chloride
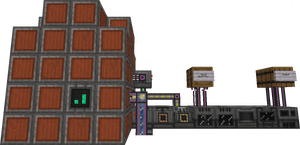
The system pictured above is simplified down to the minimum to achieve this tier—the hydrogen chloride production loop pictured does not reclaim sodium, and instead dumps it. The head for the system is provided by a Resistive Heater calibrated to 400 FE/t. The optimal value power draw for a heater will vary based on the temperature of the biome that the Thermal Evaporation Plant is built in.
Tier 4
New machines on this tier (plus machines used for gas crafting, see the description below):
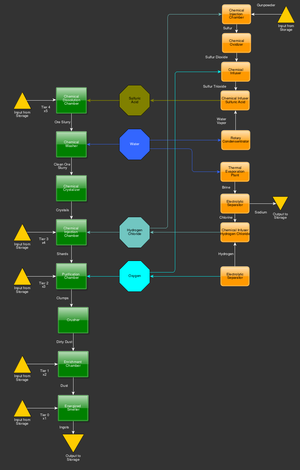
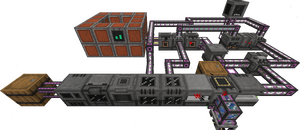
This tier quintuples ingot yield. It uses the Rotary Condensentrator, Chemical Dissolution Chamber, Chemical Washer, Chemical Crystalizer, Chemical Oxidizer, and all machines from the previous tiers.
- 1 Silk Touch Ore + Sulfuric Acid → Chemical Dissolution Chamber → Ore Slurry
- Ore Slurry + Water → Chemical Washer → Clean Ore Slurry → Chemical Crystalizer → Crystals
Crystals are then put into a Tier 3 setup to be processed.
You need a chain to make Hydrogen Chloride the same as Tier 3. You also need a source of Gravel/Flint/Gunpowder.
- Gunpowder + Hydrogen Chloride → Chemical Injection Chamber → Sulfur
- Sulfur → Chemical Oxidizer → Sulfur Dioxide
- Sulfur Dioxide + Oxygen → Chemical Infuser → Sulfur Trioxide
- Water → Rotary Condensentrator → Water Vapor
- Water Vapor + Sulfur Trioxide → Chemical Infuser → Sulfuric Acid
Video Tutorial
All links refer to YouTube's watch page.
Felipe D Tutorial PT-BR
EsquilãoBR Tutorial PT-BR
Old versions
Mekanism v6
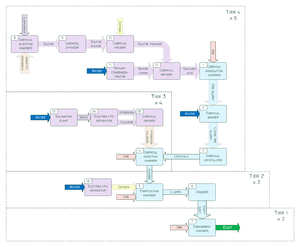
Hydrogen Chloride production:
Water → Solar Evaporation Plant → Brine → Electrolytic Separator → Hydrogen and Chlorine → Chemical Infuser → Hydrogen Chloride
Navigation
| ||||||||||||||||||||||||||||||||||||||||||||||||||||||||||||||||||||||||||||||||||||||||||||||||||||||||||||||||||||||||||||||||||||||||||||


