Tutorials/Machine Configuration
Several interfaces and some information on this page has been changed in recent versions of Mekanism.
Mekanism machines have many configuration options, allowing you to design your machine integration and item transportation systems as simple or complex as you need. This guide to Mekanism machine configuration will help you understand the basics of the Mekanism machine graphical user interface (GUI). All the machines operate with the same basic principles, so once you understand "The Mekanism Method" you should be ready to configure any of the Mekanism machines.
Contents
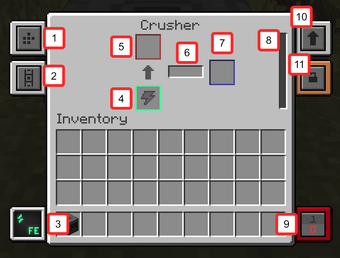
The Basic Graphical User Interface (GUI)
- Input/Output configuration
- Transporter config (you can set colors or strict input)
- Power information (mouseover only)
- Power item input, if using a battery or redstone power source
- Item input
- Progress bar / click for recipes
- Item output
- Power capacity display
- Redstone control (disable/high/low)
- Upgrade input and upgrade information panel (Speed & Energy)
Understanding Slots and Sides
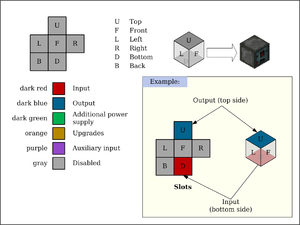
Notice in the GUI above that several of the objects have a colored border. These "slots" in the user interface are places where items can be inserted or ejected from the machine. For example, the input (4) is red and the output (6) is dark blue. These are standard input/output colors for Mekanism. You cannot change these colors, but what you can change is which side(s) each slot connects to. Yes, you can connect a single slot to multiple sides! For example, you could set the top of the machine to be the input (red), the right side to be an output (blue) and the back to be a second output (blue). In this configuration, if one output slot was blocked, the machine would try to send an item out the second output.
So how do you configure the slots? Read on...
The Configuration User Interface
The Configuration Panel can be opened from the machine's GUI. Click the button in the top-left, (1) in the GUI picture, above.
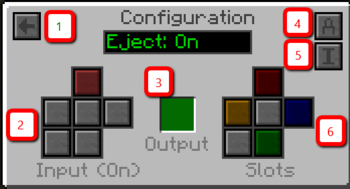
- Close configuration panel
- Set input color filters
- Set output color frame
- Auto-eject on/off
- Input filter on/off
- Slot/side assignment
Customizing Your Configuration
Everything you need is in the Configuration Panel, pictured above. It may look intimidating at first, but for most installations you will only use a couple controls.
Common Controls
- Auto Eject (4). This will tell your machine to automatically eject its output item, if there is a suitable inventory to receive it. If there is nothing to receive an item, the machine will hold onto its products. Mekanism machines will not spill your items all over the floor! :) Clicking the A button will toggle the Auto-Eject function on/off.

- Slot/Side Assignment (6). This is where you assign a specific colored slot to the sides of your machine. The image of six squares corresponds to each of the six sides. The gray box in the middle is the front, above that (red) is the top. To the left is the left side (orange), to the right is the right side (dark blue). Below the gray square is the bottom side (green), and in the lower left is the back side (also gray). Note that all sides are configured as if you were facing the machine, not from the machines point of view. You can change which slot connects to which side by clicking on the appropriate side. As you click, you will cycle through all available colors. Not all colors will be a valid slot color. So if you wanted to configure your machine like in the example with the top as the input (red) and the right and back sides as outputs (blue), the top and right are already set up, you only need to click the gray box in the lower left a few times until the dark blue color is selected. Done! It really is that easy. Gray is the "no connection" color.
Advanced Controls Looking to really customize your system? Read on!
- Output Color Frame(3). This will set a colored "frame" around items as they exit the machine. In the example above, all ejected items will have a green frame. Mekanism Logistics Pipes will use this frame color to route the items to a matching-colored destination. If no destination has a matching color, the first available destination inventory will receive the item.
- Input Filter on/off(5). This turns on/off the input filter feature for the machine. If turned on, then machine will only accept items whose color frames match the input filters. If the colors don't match the filter... they will not be accepted. You can set the input color filters by using...
- Input Color Filters(2). Like the output configuration (6), each of these squares corresponds with a side of the machine. If a color is set for one of these squares, that side will only accept items if they have a matching color frame. So if you want to be sure that coal goes to the Enrichment Chamber and not the Crusher, set a color filter on the output of the machine that ejects the coal, then set a matching color input filter of your Enrichment Chamber. Magic!
| ||||||||||||||||||||||||||||||||||||||||||||||||||||||||||||||||||||||||||||||||||||||||||||||||||||||||||||||||||||||||||||||||||||||||||||


